Hi Kindergarten Teachers! This is

School is just around the corner for most of us. Today is actually my first day with my new class.
{Side note-I get so nervous and excited the first day that I hardly sleep. My BIGGEST fear is the crier. I bribe my class with a cupcake each if the can get through their first day of Kindergarten without crying! It works!}
As I was working in my classroom this summer, my center chart (pictured below) was driving me crazy.
Center time is a favorite in my class
and an important time for social interaction, creative play, and
learning. We have 6 work centers a week and the rest are free/play
centers.
and an important time for social interaction, creative play, and
learning. We have 6 work centers a week and the rest are free/play
centers.
All this interaction takes it toll on my center board. It can only take so much abuse!
I made it a few years ago and it fits all my classroom needs.
I know it needed an update but I had no clue how to do it.

I was inspired by Caitlin from Kindergarten Smiles.
All those “Teacher Stores” have center packs that are great looking but not practical. I need my chart to be in a small area and very versatile. I also couldn’t find a chart set that included exactly what my class uses. We have working centers at our tables, but play center throughout the room.
Then, I thought… {insert thought bubble here}
Mary- you can just make your own on the computer!
Here is my updated Center Chart!
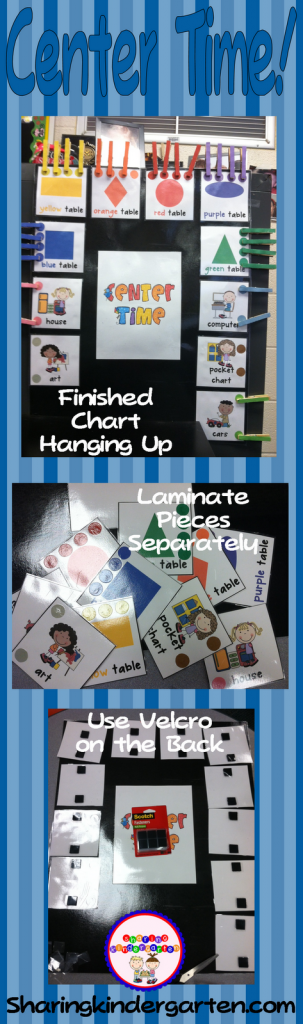
Here is my center chart pack with over 40 center pictures.


You can print it out on your printer or on your school’s poster printer!
This is how you can make your center chart!
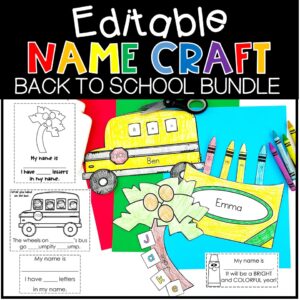
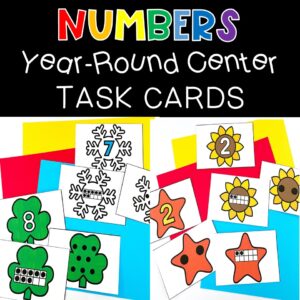
Grab my center chart file, here on TN or here on TpT, poster board if you can’t print this on a poster printer at school, and matching velcro. (I used a black poster board, so I got black velcro.)
1. Printed out all the needed center cards.
2. Organized the center cards on the board how you want them.
3. I added circles with construction paper to match my clothes pins. One circle for each pin.
4. Laminate chart and cards separately, THEN add velcro to the back of the cards before attaching them to the chart. (This allows you to change out specific centers if needed. I have found that my centers change about half way through the year, as my students mature.)
5. Add clothes pin to circles.
6. Hang chart up. (I attach my chart to a filing cabinet using magnets.)
I hope this pack and these directions help you create the best new and versatile center chart around for your new class.
How much time do your students get in centers each day?
 |
Mary Amoson, Sharing Kindergarten
http://sharingkindergarten.com/ |


Thanks for letting me guest blog for you today!
My day was… odd! I can't wait to share the story of the day… you will LAUGH!
Mary
Sharing Kindergarten
Mary,
Thanks for sharing on your first day! I know on my first day they only thing I can manage is to crash on my couch and turn the tv on! I wanted to tell you that I LOVE the way you added circles on some centers to limit the number of students. What a great way to combine accountability and independence without having to say a word! I will definitely use this idea.
Have a great day 2!
Love it – thanks for sharing it! I am heading over to grab this! This is probably a dumb question, but what are the shape cards for? I love the idea of using dots to show how many can be at each center also! Thanks again